 The Almighty Enter Key! This oh-so-satisfying submit key deserves a special button for all it's usefulness! So let's build a button to control our enter key so we can agree to terms and conditions in style.
Learn how to reprogram a MaKey MaKey to build your very own awesome and customized enter button! Bonus: It even lights up!! Check out the video below for a demonstration of how awesome an enter button is.

Tools & Materials!
Materials
-- Makey Makey Kit-- SPST Button: Like this illuminated arcade pushbutton!
-- Wood panel sized for your button.
-- Hook-up Wire (22 gauge)

Tools
-- Safety goggles-- Soldering iron
-- Ruler (or calipers)
-- Drill
-- Flat wood file
-- hot glue gun
Reprogram the MaKey MaKey! Pt. 1
1. Open Arduino IDE. To use the MaKey MaKey add-on, be sure you're using Arduino 1.6.4 or later.
The Makey Makey is programmed just like an Arduino board in the Arduino Internal Development Environment ("IDE"). Check out this awesome tutorial on how to download the Arduino IDE.
Here's a direct link to the most recent Arduino IDE software download.
2. Install the Makey Makey board add-on.

Go to the "File" menu option and open the preferences tab. In the "Additional Board Manager URLs"* text box (highlighted in the photo above), paste the following link:
https://raw.githubusercontent.com/sparkfun/Arduino_Boards/master/IDE_Board_Manager/packClick "OK". Go to the Board Manager by going to the "Tools" menu option, hovering over "Board", and clicking the "Board Manager Menu" at the top of the list. Click on the Makey Makey add-on** and select "install" to complete the installation process.
*If you don't see this option, you likely need to update your version of Arduino.
**If the Makey Makey add-on is not visible, close and re-open the Board Manager menu.

3. Under the Tools menu, go to the "Board" option and select the "Makey Makey" board.
The add-on in Step 2 should have added this option, as shown in the photo. If not, check out this tutorial for a more thorough overview of how to download the add-on.
4. Also under the Tools menu, select "Port" and choose the corresponding port for the MaKey MaKey.
If there are multiple COM ports to choose from, unplug the Makey Makey and see which port disappears. Plug the Makey Makey back in and select that Port.
Reprogram the Makey Makey! Pt. 2
1. Download the MaKey MaKey system code.
Here's the GitHub page for the Makey Makey.
Here's a direct link to download the full program. This is a .zip file, so be sure to extract all the files.

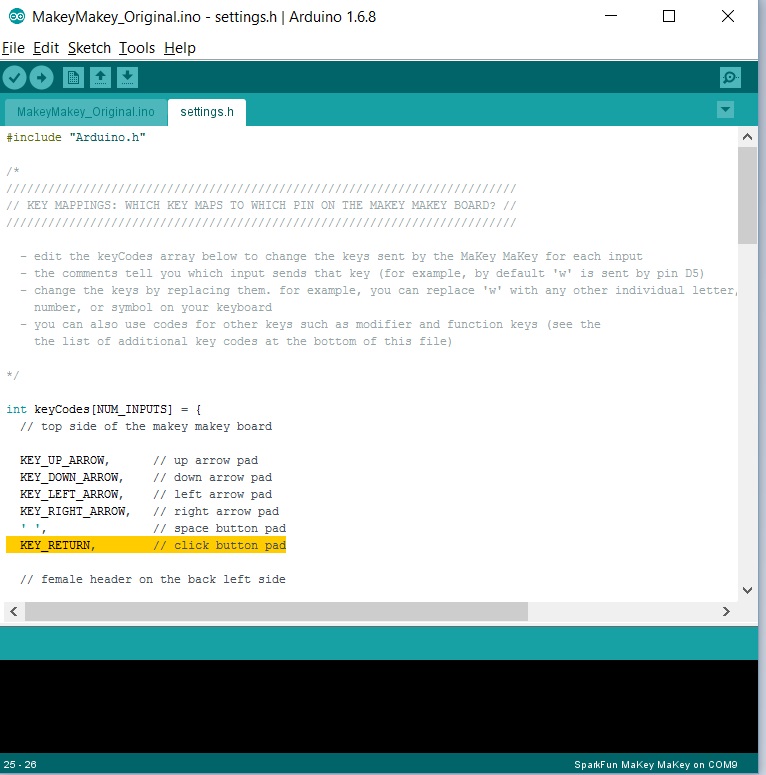
2. Open the MaKey Makey code in the Arduino IDE. Click on the settings.h tab in the Makey Makey sketch.
3. Change one of the keys into an enter key using the key code: "KEY_RETURN".
I decided to change the mouse left click button into the enter key, so I replaced "MOUSE_LEFT" (highlighted in the photo right) into "KEY_RETURN" (highlighted in the photo below).
4. Change any other keys as you see fit! Additional key codes are listed at the bottom of the Settings.h file.
Build the Button Base!

1. Measure the size of the button body.
2. Mark the wood panel where you want the center of the button to be and sketch a circle corresponding to the size of the button body.
3. Drill a hole in the wood panel for the button body.

4. File (or sand) edges of hole. Check that button fits snugly through hole.
5. Screw on the button bolt on the backside of the wood panel and attach LED section.

 Connect the Button!

1. Solder wires onto the button leads.
If you are using the same illuminated arcade pushbutton as in this tutorial, the two side pins correspond to the LED power and the two back pins correspond to the switch. Recommended to use appropriate wire colors (i.e. red for positive, black for negative) or to label each of the button leads.

2. Connect the negative button switch lead to the Makey Makey ground.
3. Connect the positive button switch lead to the Makey Makey input that corresponds to your enter key (mine was the left mouse click).

4. Connect the button LED positive lead to the Makey Makey 5V output pin on the back side of the board (top header pins).
5. Connect the button LED negative lead to the Makey Makey output pin GND on the back.
Test & Apply Button!

Check that the button successfully acts as the "enter" key (and doesn't do any funny business), then incorporate it into your program/game/everyday typing/other awesome project(s)!
A super cool extension is to light up the button LED when you make a connection between the Makey Makey pads. Check out the video below for a demonstration of this! [[If there is enough interest, I'll post the code/schematic to add this feature :)

Cool
ReplyDelete