A survey questionnaire come to life! Use (nearly) any object to gather helpful data through an interactive, engaging, and fun multiple-choice survey.
This project uses the Makey Makey microcontroller in combination with a Raspberry Pi computer to read in participants' survey choices and save the results in a text file.
Planning & Design!

Suggestions:
Prototype, prototype, prototype! Build different versions and test them on family, friends, co-workers, or (ideally) your target audience. Observe how folks interact with your survey, then use that to make it better! And always remember to keep it simple :)
Materials


- Makey Makey Kit
- Computer: Raspberry Pi
- One (1) ground piece, five (5) survey response pieces, one (1) submit piece, and two (2) yes/no pieces*
- 22 Gauge (stranded) Wire
 -- five (5) 10 - 16" strips and three (3) 6" pieces (ends stripped)
- Container:
-- Wood Box (12.5" x 12.5")
-- Plexliglass.("12 x 12")
-- Three (3) 2" x 2" wood panels
Tools
-- Safety goggles , woo!
-- Multimeter

-- Optional: Soldering iron
 , solder
 & desoldering wick
-- Ruler (or calipers)
-- Drill
 w/ both drill and driver bits
-- Flat wood file
 (to prevent splinters!)
-- Hot glue gun
-- Epoxy
(permanent)- Pliers
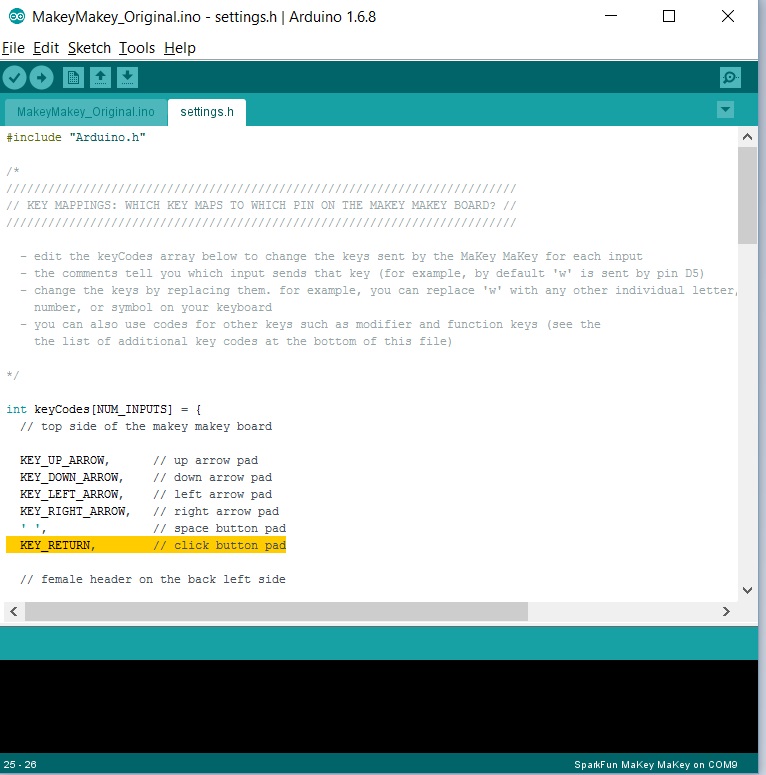
Reprogram the Makey Makey
To reprogram the Makey Makey, you'll need to have the Arduino IDE with Makey Makey drivers installed. Here's a thorough tutorial on how to do this.
 1. Plug Makey Makey into computer and open the Arduino IDE.
2. Open (or copy) Makey Makey source code:
Here's the GitHub page for the Makey Makey.
Here's a direct link to download the full program. This is a .zip file, so be sure to extract all the files.
3. Reprogram the "click" key into an "enter" key.
For a thorough overview of how to do this, check out this tutorial.
4. Change the following keys:
These two keys are mapped in the survey program, but can be left as-is or you can choose to switch other keys (e.g. the arrow keys). Just be sure to change the mapping in the program.
A. Change the "g" into an "n".
B. Change "space" key into "y".
 Build the Survey Response Pieces!

Specific materials used in this design:
- Two (2) wood blocks, two (2) golf balls, and one (1) jar lid.
- Aluminum foil
- Unistrut 1/2" Channel Nut with Spring
- Ten (10) 1/2" washers
- Plexiglass [or wood] (12" x 12")
Procedure:

1. Wrap each of the survey response pieces at least 2 - 3 times with foil, hot gluing each layer.
2. For unistrut spring pieces, hot glue (or epoxy) the top of the spring to the bottom
 of each survey response piece -- be sure that the metal of the spring is touching the foil of the survey piece.
Determine location of survey response pieces and mark with tape. Drill a hole at each point.
Place a washer on either side of the hold and screw bolt into unistrut spring about 3 turns.

4. Connect a wire to each of the unistrut spring pieces.
Wrap wire around base of bolt (between washer and plexiglass). Hand tighten the bolt to secure wire without squishing it
Build the Ground Piece!

Specific materials used in this design:
- Styrofoam ball
- Metal pipe
- Flange stand for pipe
- Aluminum foil
- Twelve (12) washers
- 4 wood screws
- Wood panel (2" x 2")
Procedure
 1. Build a stand for the styrofoam ball -- use conductive materials or wrap pieces in foil.
2. Wrap styrofoam ball in aluminum foil, leaving a "tail" of foil. Place ball on stand and push the foil tail against the inside of Hot glue pieces together.

3. Cover the exposed end of the ground wire (24") to the inside, or bottom, of base and adhere with tape or epoxy.

5. Add a layer of two (2) washers under base to avoid squishing the wire, then connect base to wood pane via screws or epoxy.
Build the Enter Key!

Specific materials used in this design:
- Clothespin
- Wood panel (2" x 2")
- One (1) wood screw + one (1) washer
The screw should be about 1/4" longer than the wood thickness.
- Aluminum foilProcedure:

1. Wrap one of the handles of the clothespin in foil.
2. Remove clothespin spring clamp, align other side of the clothespin on wood panel, and drill in a screw and washer.

Foil on the other side of the clothespin should make contact with the washer + screw when closed.
3. Reconnect spring clamp and other side (may need pliers). Epoxy bottom of clothespin to wood panel.
4. Use alligator clip or wrap wire around screw and secure with hot glue.
Make the Yes and No Keys!

- Two (2) plastic container lids
- Two (2) wood panels (2" x 2")
- Two (2) wood screws and washers
Each screw should be about 1/4" longer than the wood thickness.
- Aluminum foil Procedure
1. Cut circle out of container lids. Wrap in foil.
2. Align lids on wood panels and drill in a wood screw with washer on top -- be sure the screw slightly pokes through the back of the wood panel.

3. Use alligator clip or wrap wire around screw and secure with hot glue.
Connect Pieces to Makey Makey


2. Connect survey game pieces to the first five (5) Makey Makey back header pins on the left: "w", "a", "s", "f", and "d".
3. Connect the no button to the last (6th) back header pin, "g"
4. Connect the yes button to the "space" pads.
5. Connect the submit piece to the "click" pads.
Load the Survey Program!

Here's my code:
GitHub page!
Python program only.
Final Touches & Case!
This case is designed to withstand high traffic, experimentation, and children -- and to be easily (and cheaply) fixable and adjustable. Use this design or customize your own! Materials:
12.5" x 12.5" wood box
1" x 10 " wood panel
Procedure:
1. Epoxy wood panel onto front of box.
2. Drill the submit, yes, and no keys into the wood panel.

Recommended to put the "submit" button on the far right (switched this after further testing and feedback).

3. Drill hole large enough to fit an HDMI port in the back panel of the box.
I used two 3/8" bits and filed down the hole until the HDMI port fit.

4. Label the survey game pieces and the submit, yes, and no keys.
Test, & Install!
 Connect the Raspberry Pi to a monitor, keyboard, and the Makey Makey.
Test the program and double check all the keys. Once everything is up and running, remove the keyboard (and mouse if connected).
Connect the Raspberry Pi to a monitor, keyboard, and the Makey Makey.
Test the program and double check all the keys. Once everything is up and running, remove the keyboard (and mouse if connected). Load the python program, stand back, and let passersby have a blast participating in a survey!